Showing posts with label decor. Show all posts

Saturday, May 18, 2013

Easy DIY Picture Shelf

 
No one ever accused us of not having enough projects going at the same time.  This past weekend we worked on the deck, planted the garden, planted the flower pots, dug and sprayed dandelions, shopped for patio furniture, purchased bushes for the backyard, played with a baby, and built the picture shelves.

After pretty much running all weekend I made the following observation:  Either we need additional days in the weekend or we need fewer projects. 

One of those things we can control.

We didn't control the projects well this past weekend.

Easy DIY Picture Shelves
Link to project start posting here


Project Rankings

Difficulty - Easy
Frustration Level - Low
Makeability - 100% Worth It

Materials

Crown Molding (Note: You want to have 2 flat surfaces on the crown.  You can make the shelves as beefy as you want depending on the size of crown you get.  We wanted the shelf to be fairly skinny so we went for a small crown)

MDF Board (Note: The width of the board will be the width of your shelf.  You probably don't want to go too big here unless your crown is really thick and beefy.  If you get too big of a shelf and put weight out on the front it may not be able to support it all.  We stuck with a 3 1/2 inch width.  That easily works for the frame width and even allows some small decor items.)

Thin board for the shelf lip (we used lattice board)
Paint (If you want to do a stain you will need to switch out the MDF for a wood board instead)

Step #1:
Determine the length of your shelf/shelves.  You will want to cut your boards (all the same length) before you paint.  I didn't actually do this so I ended up having to do some touch up painting when the shelf was up on the wall. 

Step #2
Paint all shelving pieces.  Make sure you paint all sides of the MDF board as well as the lattice board.  You will see all of the edges of these 2 pieces.  You will not need to paint one of the flat sides of the crown as it will be against the wall.

Step #3
Deterimine the location for your shelf/shelves.  If you are doing multiple shelves on top of each other, like we did, you will need to make sure that you have sufficient spacing between them to get your frames on the shelf.  Locate your studs in the wall.  Frames get heavy.  You will want to make sure that you go into a few studs.  Using a nail gun (if you have one...if you don't you should they are awesome) nail your crown molding piece to the wall.


Step #4
Next position the MDF board flush on the crown molding and nail it down into the top of the crown.

Step #5
Position the lattice board on the front of the MDF board, creating a lip for your shelf, and nail into place.

Step #6
You will probably want to fill in any nail holes and do some touch up on the paint.

There you have it.  Now comes the hard part...at least for me!  What frames and pictures to select.

FYI after looking at a ton of different picture frames I did end up getting all of my frames from IKEA.  I was going for a bit cleaner/simpler look so I choose simple frames in a couple similar styles.  I do like the look of a bunch of different styles of frames...but not for me.

Add a few small decor items if you want and call it a day.  The beauty of this project is that you can easily switch out photographs, frames, etc.  No drilling and hanging frames on the wall.
Before
 
Concept
 
After
 
I am really happy with how this project came out.  I even like the red color!


Wednesday, May 8, 2013

Red Rum


I may hate the paint color I picked for the picture shelves.

I broke one of my own cardnial rules...ALWAYS get a paint tester and try out a few shades before making a final selection.

I didn't get a tester, I just made a selection.

I may have messed up.

It may be too red.

I may have to repaint.

My plan is to do a final color check with the boards inside the house later today once everything is completely dry.

I may be painting again tomorrow.

Monday, May 6, 2013

Too Many Pictures: Picture Shelf Project


I knew it was going to be a problem.

I have so many pictures of baby girl that I am a bit overwhelmed.  How do I pick just a few to print and display?  Where do I put them?

As I have posted in the past I am not really good at hanging things on my walls.  I over think.  Now with all of the cute baby pictures I need to get my act together and get displaying.

Have I mentioned how much I like Pinterest?  I have...well I am mentioning it again.

I knew I wanted some sort of wall display that I could easily switch out pictures.  With her growing so much everyday my favorite pictures change quickly.  I also want to be able to change the orientation of the frames from landscape to portrait and back again.  I hate being stuck with a specific direction needed for a specific frame as I don't like to think about what direction I need the picture when I am taking it.  I want to be able to shoot the picture in the direction that I think looks good in the moment.

Bottom line is that I wanted maximum flexibility.

After looking around at a ton of options I was really drawn to picture shelves.  Not only could I rotate the frames and switch out the pictures easily I could even potentially include a couple small decor items to add some additional interest.

Which wall to choose?

I immediately knew I wanted to put the shelf/shelves on one of the walls in the main living room.  After all I wanted everyone to be able to ooh and aah at baby girl (can't hide those away in an obscure hallway).


The wall I picked out is a main wall that is against the stairs.  The problem was that it had a light switch and thermostat on it.  The husband did not think this wall would work.  I begged to differ.

Visualization works well for both of use when we are trying to sell a project plan to one another.

So I took a picture of the blank wall.  Uploaded it to my favorite photo editing site PicMonkey.  Added in some shelves and then did another one where I did a quick mock up of some frames.


It really helped the husband to see how it would work around the light switch and the thermostat.  Doing the mock up also helped me get an idea of how many and what sized frames I wanted.  I highly recommend doing some sort of visualization either by putting paper up on the wall or by photo shop, especially if you are wall art impaired like me.


The plan is to build a simple shelf using a piece of crown molding.

So in the midst of all of the deck shenanigans I will be working on the shelving project.  Wood has been selected...

...I'm off to paint. 


Monday, December 31, 2012

What a Year - Nursery Craft Photo Bomb


It is the last day of the year.  What a year it has been!  This has definitely been the year of the baby.  Our entire year has revolved around the upcoming little one.  Even before she was a reality.  It has been a bit of a roller coaster of emotions but 100% worth it!

I won't be posting a top ten Wood and Cloth blogs from the past year as I probably didn't post many more than ten! 

So instead I will try to get caught up on posting the craft/decor items that have been completed for the nursery.  I got a bunch finished this holiday vacation which is a good thing as I swear the baby bump has grown exponentially over the past couple of days.  This is making sitting or standing too long uncomfortable.  Add in the fact that I have to sit a good distance away from the sewing machine and the number of projects getting done over the next few weeks is probably pretty limited. 

Project #1 - Pinwheel Pillow

I did post a picture of this in a previous post.  It comes from a wonderful tutorial from Cluck Cluck Sew.  A pinwheel pillow?  I couldn't pass it up. 

Project #2 - Bunting

Simple bunting made with bias tape. 

Project #3 - Paper Pinwheels.

I still have a few of these to make, finding double sided scrapbook paper is more difficult than one might imagine.  There are a bunch of tutorials for these out there on the web.  I used paper drinking straws for the stems.

Project #4 - Framed Paper Elephant w/ Pinwheel.

This is the first of a few projects that were put in painted picture frames.  All of the frames came from IKEA and were originally white.  I will note that some of the frames did not take to the paint as well as others.  No biggie I just did a few more coats and then decided that the white that bled through was character!

For this little guy I just found an image online for the elephant pattern, put a bit of baker's twine on and glued one of my pinwheels.

There are many options for nursery art with elephants holding a flower but I thought the pinwheel would work well...and I think it did!

Project #5 - Framed Paper Punched Elephant

I am going to preface this project...I will most likely redo this one a bit.  I threw this together using hole punched elephants (the punch is from Martha Stewart) in a few minutes.  I didn't really measure and it looks a bit sloppy to me.  However when you are showing off your nursery for the first time to visiting family members sometimes it is enough just to get it done. 

I really liked this punch as it allows for some dimension with the ears that you can fold up. 

Project #6 - Fabric Covered Letter
 
I never really found a great tutorial on how to cover a paper mache letter...so I winged it.  Honestly I just cut and glued a bunch (using fabric glue) trying to make the seams as unnoticeable as possible. 

Project #7 - Headband Holder

The inspiration for this project (which is technically a Wood project) came from a tutorial by Shanty 2 Chic.  We ended up changing it up a bit and using small turned wood feet.  The husband gets partial credit for this one although I probably could have assembled it my self.

Project #8 -  Monochromatic Sayings

I saw this idea on Pinterest and unfortunately when I went back to see how it was done my link took me to spam so I improvised.  The husband had cut me plywood boards awhile back for a different project (I decided against doing that one, at least for the time being) so I used them as my backing.  I think the original one used canvas which would also work.  I then attached wooden letters using wood glue and painted.  As a piece of advice I would not suggest gluing the letters to the wood backing until after you have painted the wood backing and the letters separately.  It was a bit of a pain to paint them together and made for some sloppy brush strokes.

Project #9 - Throw pillows
2 sets of throw pillows, one with piping, no biggie. 

Project #10 - Elephant Pillow

I purchased this elephant pattern from Gingercake Designs.  I have done patterns from this shop before and really liked them.  I struggled a bit on this pattern as I felt some of the instructions were not very clear.  It could have been my pregnancy brain however.  I would recommend using a very light weight interfacing as I used the light weight one I normally use and it was WAY too stiff causing a mess when I turned the pattern out.  I may potentially redo this little guy but we will see....

Project #11 - Paper Elephant Family

Just scrapbook paper.  I liked the simplicity.


So that is it, the BIG nursery craft project round-up.

Hope everyone as a wonderful last day of 2012. 
Bring on 2013!!!


Friday, December 28, 2012

A Place to Rock Out


It is not that easy to find a rocker or a glider that fits a short person.  Many are too deep leaving my feet dangling over the edge.  The deep ones are also too difficult to crawl into (especially if one is holding a baby).  You can find huge rockers that take up half of your usable space.  You can find really expensive ones that take up half of your budget.

After a bunch of looking we did find one that was affordable, fit in the space, and was short person friendly.  I did briefly entertain the idea of reupholstering the chair so that it would match a bit better in the nursery but thankfully the husband talked me down.
(I did make the pinwheel pillow!)
 
Now we needed a table.  As the husband somehow managed to get away with not having to make any furniture pieces for the nursery this project fell squarely in his court. 

I found a table/pattern I liked online.  It didn't quite work for our space so the husband made a few adjustments to dimensions and added a small lower shelf.

He ended up putting the table together so quickly I didn't even get any in progress pictures or instructions for a tutorial!  Oh well I got a table.


Most nights you can find me rocking away in the chair reading a book or singing a lullaby. 

Thursday, December 27, 2012

Time Was Ticking...


I hope everyone had a wonderful Christmas.  I think I sat down yesterday for the first time in 5 days.  The holidays are exhausting, especially if you are pregnant!

I somehow managed to throw together the ottoman "packages" before everyone came over to the house for soup and candy house making.  I really should have left this project for next year instead of trying to cram it in last minute but...

Slipcover Packages

Project Rankings
Difficultly - Easy
Frustration Level - Low
Makeability - 100% worth it!

Materials
Fabric
Ribbon
Bow

Warning! I just kind of threw these together not really caring if my seams were good or anything.  They are going to sit under my table for decoration so I didn't take any great pains.  If you are looking for a precise tutorial with perfect corners you came to the wrong place!

Step #1:
Measure the dimensions of what you want to cover and then add some extra for seam allowance.  You want your slipcovers to be pretty snug but not too snug that you can't get them on.  I ended up adding 1 inch to each of the sides using a 1/4 inch seam allowance with left about 3/4's of give which seemed to work out great.


Step #2:
This is the hardest part especially if you don't have square ottoman's.  Lay out all of your pieces so that you know which sides connect to each other.  I actually got messed up (I am going to blame pregnant brain) and ended up having to rip out a ton of seams the first time I tried to assemble one of them.  I worked one side at a time pinning them together and then sewing with a 1/2 seam allowance.  I did leave about 1/2 inch open on each end of the piece.  This allows you to turn under the bottom edge to make it look nice.  It also allows you to piece together the corners.


Step #3:
When you get to a corner just kind of bunch and pin all of the pieces together (as shown in the picture and sew all the way to the edge to finish up your corner.

Step #4:
When you get to your last piece you may have to make an adjustment to make your slip cover a bit tighter.  I ended up sewing a 1 inch seam allowance for the final piece as 1/2 inch would have made the cover a bit sloppy.  Again this is a really rough decorative/non-function cover so I improvised.

Step #5:
Note:  I did not do this step but if you want a more finished look you can turn under all of your bottom edges and sew them.  I just kind of tucked mine under the ottoman for this year...maybe next year I will finish the seams (but probably not).

Step #6:
Put your bows on.  I crapped out an bought a bow for the top of my ottomans.  My bow making abilities leave a lot to be desired.  Done.

Wednesday, December 12, 2012

Lullabye and Good Night


I am not very good at wall decor.  I panic and tend to over think too much which leads to me having a ton of empty/blank wall space.

So the thought of figuring out what to put on the nursery walls sent me into a mini panic.  Well that, and the hormones.

I haven't been sleeping great, not that I ever have, so I often troll Pinterest for ideas in the wee hours of the morning.  On one such occasion I did come across an idea from Project Nursery to frame sheet music from a favorite song or lullaby.

Now came song selection time.  My original thought was to use a favorite lullaby my Mom used to sing me...Horsey, Horsey, On Your Way.   After some searching on the Internet I found out it is an old English lullaby that has a couple different versions.  Unfortunately I was unable to find the sheet music for the version I wanted.

Next up I thought I would like to frame St. Judy's Comet by Paul Simon.  I have always loved Paul Simon and there are a couple of songs of his that I hope to make into lullabies for baby girl.  The problem with my selection was that the original song is written for a boy.  When I sing it ( if you want to call my vocalizations singing...my family is not known for their melodic talents) I change the words to a girl but I wasn't sure I wanted it framed with the boy version.

I went through a couple more options but found out that many had more than three pages of music and would not work as I only want to frame three.

Finally I settled on Baby Mine from Dumbo.  It was perfect.  Sweet lyrics, three pages, and even tied into the elephant theme.  Now to find the sheet music.

Apparently no one buys actual sheet music anymore.  It is either digital or only offered in compilation books.    I did make a trip to one of the local music stores only to find out that no they didn't have it in stock but they could order it in.  The problem was it would take 4 weeks to get and the store was closing its doors forever in two weeks.  So I decided to buy it digitally.

Now the problem was that I needed it bigger than my printer could handle and I wanted it on paper with a bit more character than stark white.

The husband enlisted the help of a friend of ours that is a graphic designer.  He created an ivory background for behind the music so that we could take it to be anywhere on white paper. 

For the frame we used a frame from IKEA with a white matte.  I wanted a bit more "pop" so we painted the matte with the dusty rose accent color.

The result is exactly what I wanted.

Now I need to work on signing the song all the way through without crying.  I get to the last verse and I lose it.

"From your head down to your toes.  You're not much goodness knows.  But you're so precious to me sweet as can be, baby of mine."


Friday, December 7, 2012

You have to taco it!!!

This is the last time I am doing this...

My favorite feature in the nursery is the built in that Wood made with the window seat.  I have always envisioned a little one curled up underneath blankets surrounded by pillows and books.

I was very excited when I found the perfect fabric for the nursery window seat.  I actually found this fabric back before we knew that she was a she!  I loved the plaid (as I have stated before I really like simple patterns) and the fact that the colors were not super pastel but a bit darker, more tinted.  (FYI...I found the fabric at JoAnn's in the home decor section.) 


It had been a couple of years since I did the original window seat cover that was used when the room was a craft room.  I had forgotten the horror.

I had forgotten what a pain it was to work with such large pieces of fabric and foam. 

I am not a fan of working with large pieces of fabric as I always find it a bit difficult to get things cut correctly.  Also it is hard to find a large enough spot to do the cutting...especially one that doesn't include pugs. 
(Yes those are Halloween decorations...I cut the fabric a long time ago!)

Thankfully having the plaid pattern made it a bit easier as I was able to cut along the natural lines in the fabric.

I followed an amazing tutorial by Sew, Mama Sew! that can be found here. This is a very nicely put together tutorial that I follow exactly only omitting the handle part as this is not a portable cushion.  Also the piping and continuous bias portion of the tutorial is one of my favorites.  I use that technique to make all of my piping for pillows etc.  You should definitely check it out!

One tip from me to you is to check out foam from Home Depot.  Seriously Home Depot.  Foam as I have stated before is like gold and costs about as much if you get it from the fabric store (even with 50% off deals).  The husband's Aunt put us onto the Home Depot foam which is slightly less dense than the high density stuff at JoAnn's but not by much.  Home Depot carries foam pads for camping.  I am not sure if they carry them year round but it is worth checking out.  We got a 3 1/2 inch thick pad for about half of the cost of going to the fabric store.

The longer I worked on this project the more certain I became of this fact...this will be the last window seat cushion I do for this room.  Either baby girl will live with this cushion fabric until she turns 18 and moves out or she will go without a window cushion.

The husband and I spent some of the most frustrating and funny 40 minutes of our lives trying to stuff the foam padding into the cushion.  Let me set the scene...

Our window set measures 7 feet long.  The longest zipper I could find at the fabric store was 2 feet long.  While I suspect I could order something longer online I didn't. So can you picture the issue?  We have to manhandle the huge piece of foam into the tiny zipper opening.  What resulted was both Wood and Cloth breaking a sweat while trying to twist the foam into submission.

At one point about 30 minutes in the husband let loose with the comment..."you have to taco it more, taco it more"  at which point the wife started laughing uncontrollably losing her kung-fu death grip on the foam resulting in a major setback in the stuffing operation.

Finally, after recovering our composure, we were able to somehow wrangle it into the cover.  The only way that foam is coming out of that cover is by scissors or the jaws of life.

For all of the grunting and groaning, twisting and turning...I love it.  The fabric is exactly what I wanted for the room.  What a perfect place for baby girl to read her stories. 
(I'm not quite ready to show the entire built in, still a bunch of work to do so this is just a teaser...)

I have a couple of pillows made but still need a few more.  So many projects so little crafting time!

Wednesday, December 5, 2012

Gingham Style

 
When I started to think about the nursery I didn't want to go the super matchy matchy bedding/decor set route.  Not that there is anything wrong with that it is just not my style.  I really enjoy selecting or making individual pieces myself.  Early on I found the perfect material for the window seat in the nursery.  A plaid pattern with dusty pinks and sage greens.  From there I knew I wanted to focus more on colors and patterns than an actual theme.  I also didn't want to go overboard with the pastels.  So I chose the sage green and the dark dusty rose to be my accent colors in the room.

I looked a bit at window coverings to use for the curtains on the closet but did not find anything that I loved...So out came the sewing machine.

I found 2 fabrics that were perfect and decided to make my own curtains.  It seems like it would be pretty easy to piece them together...and it was!

I love the result it is exactly what I wanted.  A pop of color with a bit of pattern.  I really like the way they frame the closet.

Project Rankings

Difficultly - Medium
This gets a medium only as it is a bit difficult to calculate and determine lengths that you need for the fabric.  You need to take a number of things into account.  I tried to list them all below.  I have also included the  dimensions I used as a starting point.  The actual piecing this together is a cake walk.
Frustration Level - Low
Makeability - 100% worth it!


Materials

Fabric -
I used 2 different kinds but obviously you could do more or less.  As far as how much fabric you need it will depend on the length of your panels and the width you need.  the specifics listed below are for what I used on my closet.

My dusty pink fabric came from Joann's.  It is a home decorator fabric.

My gingham fabric is from IKEA.  It is also a nice home decorator weight.  I am not sure if you would want to mix a simple quilt cotton and a decorator weight...2 cottons would probably work though.

1/2 inch fusible tape
Normal sewing stuff, pins, thread, sewing machine, etc.


Step #1: 
You will need to measure your area to determine the width and length of your panels.  I can't stress enough that you should measure twice and cut once!  You will need to determine if you want your curtains hitting the floor or not, I did not.  You will also need to determine how high above your window or closet you want to place your curtain rod.  If you are doing multiple fabrics you will need to determine how much length of each you want.  I wanted my second/bottom fabric to be smaller than the first as I wanted the pattern piece to only be an accent and not overpower the room with the gingham pattern.  For the width of your fabric you will need to determine if the curtains are just for shoe or if you want them to be able to be untied and pull across your entire closet or window.  I did so I did make the panels wide enough to cover up the closet (in case it is a mess and company is coming over).  All of those decisions will factor into your dimensions.  In addition you will need to account for seam allowances as well as the width of your curtain rod.
Listed below are what I did and why so that if you are inserting your own measurements you will need to make your adjustments.  I added 1/2 inch to each edge for a seam allowance.  This allowed me to sew a 1/4 inch, turn under a 1/4 inch and top stitch.

Dusty Pink Top Fabric - Cut 2 of this size for the 2 panels.  56 inches long x 36 inches wide

Gingham Bottom Fabric - Cut 2 of this size for the 2 panels.
27 inches long x 36 inches wide

Additional material is needed if you plan on sewing the tiebacks.  You could also use cute ribbon or something like that. Or you can make your own.  The instructions for the tie backs are at the end of the curtain tutorial.

Step #2:
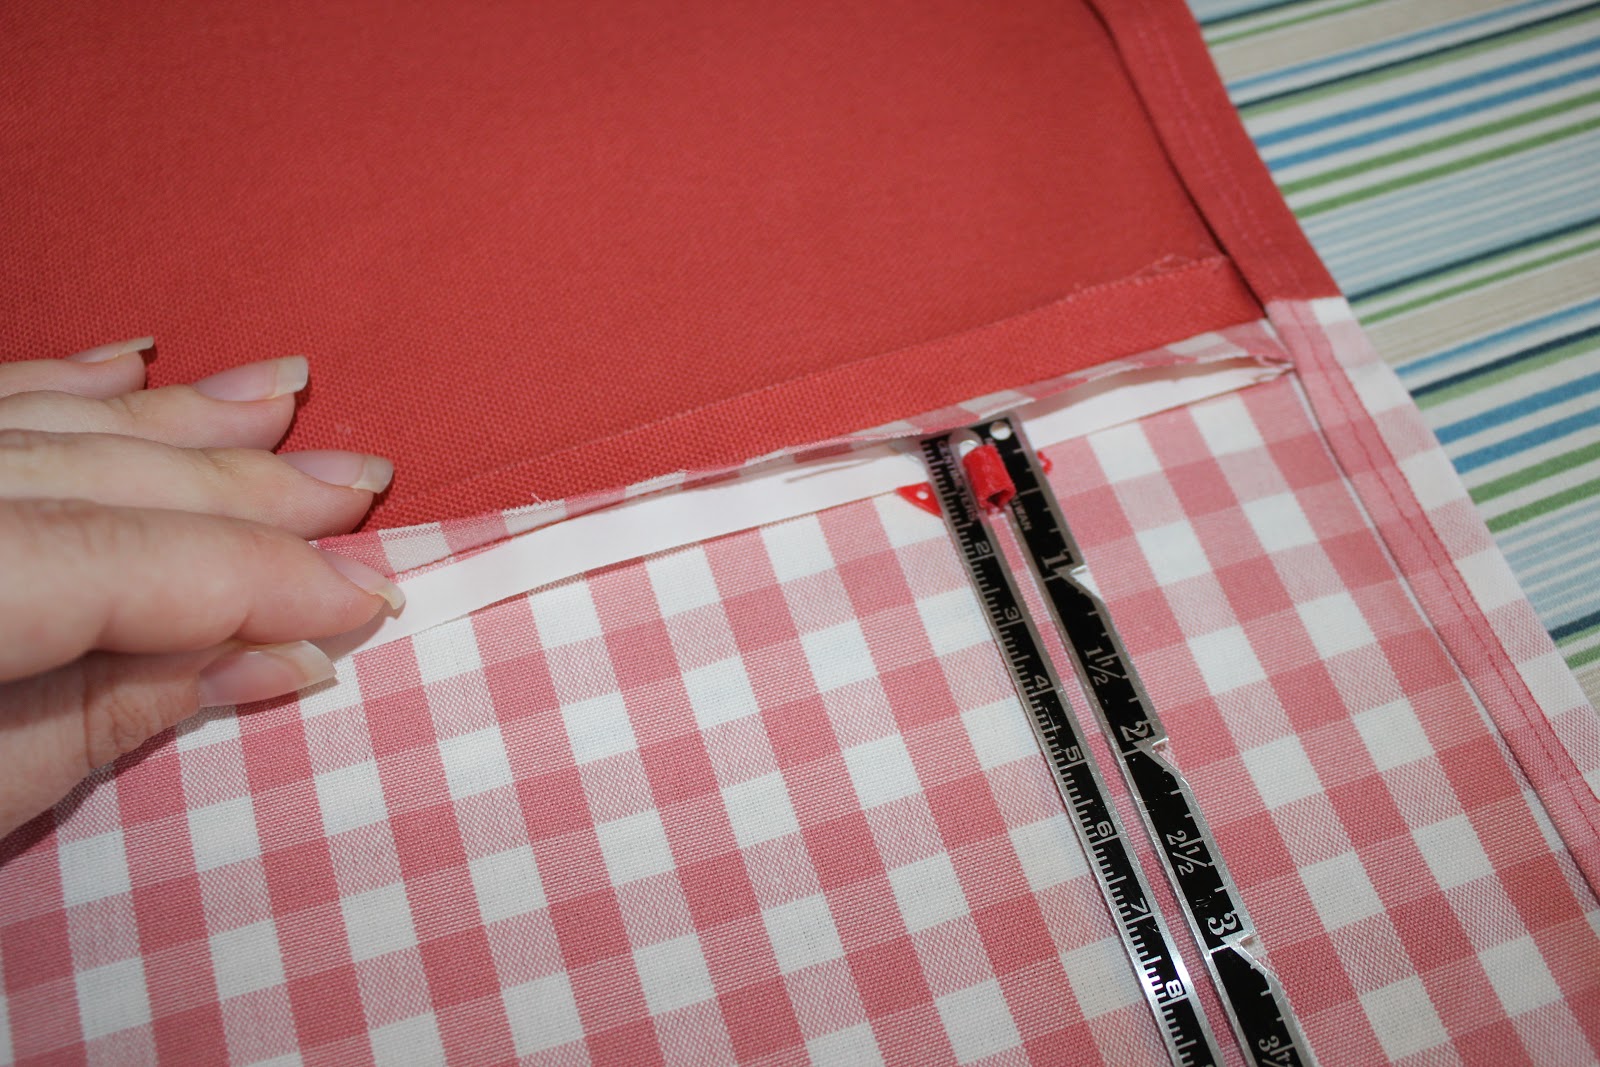
Pin the right sides of your 2 pieces of fabric together.  Sew together using a 1/4 inch seam allowance.  Press your seams out.

Step #3:
Cut your 1/2 wide fusible tape in half to the width of your panel.  Place one of your 1/4 inch tape strips under the pressed out seam as shown in the picture. Iron in place.  Remove the tape backing and iron the fabric seam down onto the tape.  Repeat for the other side of pressed seam.

Step #4:
Next up pick one of the long sides (not the top or the bottom of the panel) and turn fabric under 1/2 inch (turn under to the wrong side).  I pressed out the turn under and also pinned it (I like to use pins...). 

Step #5:
Sew in place using a 1/4 inch seam allowance.

Step #6:
To make it more "finished" looking I turned under another 1/2 inch and sewed another 1/4 inch seam allowance.  That way I don't end up with any rough fabric edges.  I could also just turn under twice and then sew once but of course I didn't really think about that at the time.
Step #7:
Repeat Steps 4-6 for the other long side of the panel.

Step #8:
Working on the bottom of the panel turn under and sew as described above.  Because you are folding under some of the long sides those will be a bit bulky but should go through your sewing machine...hopefully!  At the end of this step all of your sides should look nice and finished with the exception of the top part of the panel.

Step #9:
Working with the top of the panel fold over 1/2 inch as described above and sew using 1/4th inch seam allowance.

Step #10:
Measure 2 inches from your newly finished edge down an pin.  This will create the pocket that you will slip the curtain rod into.  See picture.

Step #11:
Sew into place.  I sewed directly over my seam from the turn under as shown in the picture.

Tie Backs Instructions

Step #1:
Cut 4 pieces of your desired fabric ~30 inches by ~5 inches.

Step #2:
Pin 2 pieces right sides together and sew around all edges using a 1/4 inch seam allowance.  You will need to leave about 1-2 inches open in order to turn out your fabric.

Step #3:
Turn your fabric right side out.  Press out the seams being sure to fold and press under your open portion.

Step #4:
Top stitch around the entire tie back using a 1/4th inch seam allowance.

There you have it curtains!

Friday, November 30, 2012

Holiday Time

This past holiday weekend Wood and Cloth took a break from the nursery and worked on Thanksgiving and Christmas related activities.
First up was cooking Thanksgiving dinner.  We actually go over to the husband's parents' house and have dinner with his family.  We do however like to have a bunch of leftovers so every year I make a full on feast for us to eat at home.  This includes a 16 pound turkey (yes it is only the 2 of us but don't forget we do have 3 pugs...) artichoke stuffing, fresh cranberry sauce, mashed potatoes, sweet potato casserole, rolls, frog eye salad (this is for the husband as the wife will not eat it), and a cherry pie.  This year I also got a bee in my bonnet that I wanted to do turkey stock and turkey noodle soup.  I think I forgot I was pregnant and maybe spending hours on my feet standing in the kitchen working on mounds of food was not a great idea.  Or maybe I was truly feeling my pregnancy cravings and baby girl wanted a ton of yummy turkey day related food.  Either way we ended up with a ton of food that we have slowly been working our way through since Thanksgiving.


It was a good thing that we had some much food as we burned a ton of energy and calories getting the house Christmas ready.  It was a bit of a challenge for me this year. It was hard for me not to be able to run bins of decorations up from the basement.  I could carry the lightweight things but after a few trips up and down I started to feel winded so the poor husband was left with the bulk of the work.  After all of the bins were upstairs in true Wood and Cloth tradition we put on National Lampoon's Christmas Vacation and started to deck our halls.

The husband and I have done a bunch of stupid DIY stuff over the years.  Sometimes the endeavour is stupid because we should have just purchased something and saved ourselves a bunch of trouble.  Sometimes it is idiotic because there is a chance of bodily harm (not usually death mind you).

One of these stupid activities is hanging 3 very large wreathes in our living room.  This year marks the third year of stupidity.  The first year involved the husband hand carrying the wreaths up a very tall and steep ladder and then swinging them into place.  We actually did have an incident that first year where the largest wreath fell down.  While no one was hurt we do have a pretty good scuff mark on the wall that we have left untouched to remind us of our moronic past.
The second year the husband got smart (well a bit smarter as if we were really smart we would not put up the wreathes in the first place).  The new plan involved rope and a pulley system.  The plan involved looping the rope around the wreath and the top rung of the ladder.  The wife would then pull the wreath up using the rope from the ground while the husband was on the ladder waiting to place the wreath into position.  This system was a success.  No wreaths plummeted to the floor and no husbands feel off of the ladder.

So for our third attempt we absolutely were going to use the rope method again.  One small problem.  The wife was no longer in the position to pull the wreath up.  This year the husband had to do the pulling until the wreath was up at the top of the ladder.  I then used my extra weight to hold onto the rope making sure the wreath didn't come down while the husband climbed the ladder to put the wreath in place.  Again no major incidents.  You will notice the "JOY" is a bit off but it was close enough.  I wanted to take pictures of the husband on the ladder and swinging the wreaths into place but that idea was quickly shot down as I was reminded about the husband's fear of heights and that he would like me to stay to steady the ladder.  Fair enough.

With the wreaths in place we went to work putting up the rest of the decorations.  It took me longer this year as I had to stop and take breaks quite frequently.  While I might like to think I can still do everything I did before I am about to start my third trimester and things are getting more difficult.
It took the better part of 2 days for me to get up all of the decorations. 

I couldn't help but think about how next year I will have a 9 month old to "help" me put up Christmas.  I might have to adjust some of my decorations as I am not sure that she will have the patience for Mom to hand tie with fishing line Christmas ball ornaments to the banisters... Next year I may just have to throw some tinsel around and call it good.